Monday, February 22, 2010

Rear Sync - Flash

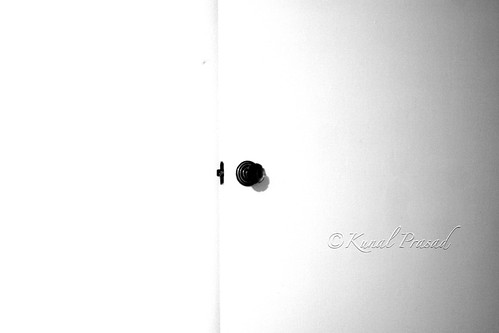
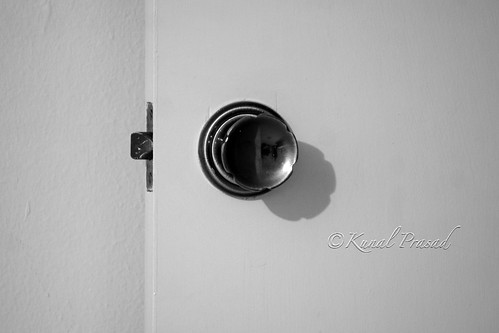
There's a setting on you camera that will help you get better-quality photos using flash. It's called Rear Sync, and what it basically does is change the time when the flash actually fires. Usually flash fires the moment you press the shutter button, so it does freeze any action in the scene, but it also generally makes everything solid black behind your subject (like you see in most snapshots). Changing to Rear Sync makes the flash fire at the end of the exposure (rather than the beginning), which lets the camera expose for the natural background light in the room first, and then at the very last second, it fires the flash to freeze your subject. Now your background isn't black - instead, it has color, depth, and detail, and this gives you a much more professional look all the way around. In the example below, the shot on the left is using the normal default flash setting (notice how dark the background is). For the shot on right, I switched the flash to Rear sync.


Give it a try and you'll see what I mean (just remember to keep the camera still when shooting in Rear Sync mode, because the shutter stays open longer- enough to expose for the background.)


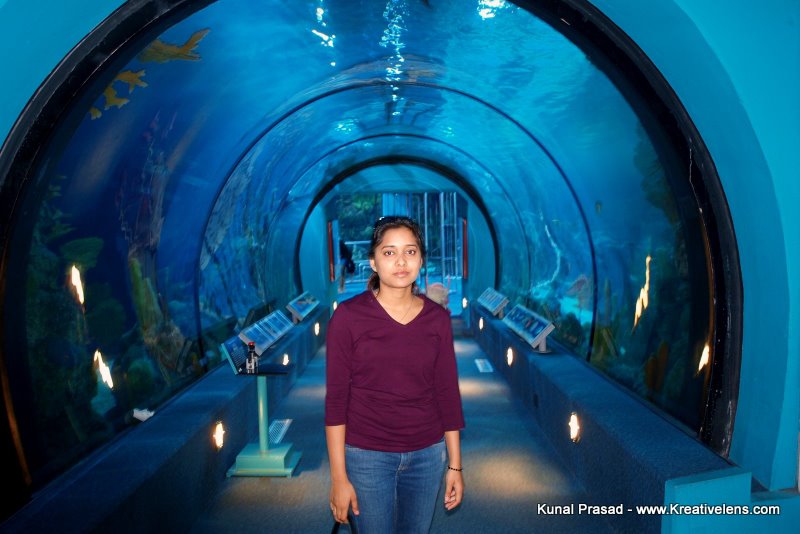
This setting is very useful, while shooting in an aquarium where you want to capture the subject along with low light activities in background.

Monday, January 25, 2010

Depth of Field


While using point and shoot cameras never have given depth of field a second thought. Thats because the lens on a point-and-shoot, is deliberately designed to provide the maximum possible depth of field.
In fact it is one of the most important controls in photography. Depth of field can be used to disguise or soften objects within the frame, or to make a photograph look so sharp that it almost comes alive. A lens can focus precisely at only one distance at a time. To be completely sharp, the image must record points of light reflecting from the subjects as points of light on the sensor. Away from this plane of focus, points are recorded as minute circles, known as "circle of confusion". The larger these circles, the more out of focus the sot appears. For certain range of distances, the circles are small enough and to look like points, so the image appears sharp. This in focus range is known as the depth of field. For the 35mm format, the least circle of confusion is usually considered to be 0.0015in (0.036mm)

Three ways to affect depth of field.

1. Aperture - Making the aperture smaller increases the depth of field, while opening it up restricts it. The amount of available light also has some impact on depth of field. In low - light conditions only way to achieve a wide depth of field (using a small aperture of f/11) would be to have a long exposure of say, 2 sec or longer, in which case you'll certainly need a tripod. The opposite happens in very bright conditions, where the only way to achieve a very narrow depth of field (using a large aperture of f/2.8) would be to have an extremely fast shutter speed of, say, 1/4000 or even 1/8000 sec or use dark filter in front of lens.


Picture on left shot at A = f/35 , Focal length 617mm. Picture on right shot at A = f/4.5 , Focal length 617mm.

Due to larger aperture (f/4,5) out of focus subject is very very blurred.

2. Focused distance - At close distances, all lenses offer less depth of field than when they are focused farther away as seen below.


Both pictures shot at A = f/5.6 , Focal length 193 mm but focused on different object.

3. Focal Length - The amount of depth of field reduces dramatically as focal length lengthens.


Picture on left shot at A = f/5.6 , Focal length 193mm. Picture on right shot at A = f/5.6 , Focal length 64mm.


A point to be noted: Depth of field usually extends farther behind a focused subject than it does in front of it. The depth of field behind the focused point is approximately twice that in front.


Some informative links on Depth of Field.

Depth of Field Calculator
More on Depth of Field calculator


Thursday, December 31, 2009

Transition from Point and Shoot to DSLR


Point and Shoot world talk about the optical zoom whether it is 10X Optical zoom, 12X optical zoom or so forth but in SLR world we talk about focal length range of 18 mm - 35 mm or 70mm - 300mm and so forth. Lets see the correlation between optical zoom and these focal length ranges.

Optical zoom is calculated as a ratio of maximum focal length to minimum focal length. Which means if a lens has a range of 18mm - 55 mm then its zoom factor is 55/18 = 3X Optical zoom and similarly for 70mm - 200mm lens zoom factor is 200/70 = 3X (approx). Thus we see that optical zoom in both the case is approximately the same but shots captured from them will be different, explained later below.

In the specifications of Point and Shoot cameras it will be mentioned : Optical zoom is 12x and focal length is of range 36mm equivalent - 432 mm equivalent. This does not means that lens used in point and shoot has a focal range of 36mm to 432 mm but actually might be 6mm to 72 mm. So why do they mention 36mm equivalent - 432 mm equivalent lens. This means picture taken from these lenses will feel the same as taken from 36mm lens - 432 mm in 35mm cameras.

Because many people are familiar with focal lengths of lenses for 35mm cameras, the digital camera manufacturers choose to describe the focal length of their cameras by reference to the focal length that would produce a similar field of view on a 35mm camera.

By describing the lenses this way, the digital camera companies appeal to users' familiarity with 35mm camera equipment.

Lets see in little detail:

Change of field happens because the sensor size is different in different cameras. (smaller the sensor size cheaper the camera, more noise at low light).

While normal film cameras take 35mm film (it is a standard for the industry) there is much variety between manufacturers on image sensor sizes. The main reference point that people therefore use is the 35mm one which is considered ‘full frame’ size.

Details on this can be found here http://www.panoramafactory.com/equiv35/equiv35.html

The CCD arrays on digital cameras are typically much smaller than the imaging area of 35mm film. This means that the focal length that produces a "normal" field of view is much smaller in digital cameras.

Let me show this by an example. Here I am using two cameras to show the difference Sony Cybershot DSC H2 and Canon EOS 350D.

Specifications about sensors size and lenses are below:

Sony DSC H2
Sensor size 5.75 mm X 4.31 mm.
Lens Focal Range = 6.0 mm - 72.0 mm
Lens Focal Range (35 mm equivalent) = 36.0 mm - 432 mm

Canon EOS 350D
Sensor size 22.2 mm X 14.8 mm
Lens Focal Range = 18.0 mm - 55.0 mm ; 70.0 mm - 300.0 mm
Lens Focal Range (35 mm equivalent) = 28.8 mm - 88.0 mm ; 112.0 mm - 480.0 mm


Top picture is from Sony at focal length ~ 70 mm and bottom one from Canon at focal length ~ 70mm. The picture shows the difference in angle of view due to different sensor size shot at 70mm focal length.

Now lets see how equivalent Focal helps


Top picture is from Sony at focal length of 70 mm which is equivalent to 432 mm in 35mm camera. Next picture shot from Canon at focal length 270mm which is equivalent to 432 mm in 35mm camera. These two pictures look similar even though at different focal length and gives an impression of picture taken from 35mm camera at 430mm focal length..

Because of the smaller format of DSLRs, telephoto lenses have a narrower angle of view than the same lens on a 35mm camera – this is the so called ‘crop’. Angle of View is simply that viewing angle which fills the frame (of any format). This determined by the film format in relation to the focal length of the lens – not the focal length on its own.

‘Crop’ is a fairly good term – the imaging area is physically smaller. Less of the image circle projected by the lens is used, therefore it is a crop. The image remains the same size at the film plane for a given lens and subject distance – it is in no way magnified. It does, however, take up a larger proportion of the (smaller) frame and so it is easy to see why some people call it a magnifying effect. This is also why a tele lens appears so much more powerful – the field or angle of view has been reduced. This is great for nature and sports photographers as the net result is more real pull than before with no trade off of maximum F Stop loss.

As an example: on a 35mm camera a macro lens focuses a 24mm long insect onto the film at same size – this is known as 1:1 ratio, or Life Size. 2.4cm on the film is about 2/3 of the frame in length so it will print to 2/3 of whatever (full frame) print size is made. On a DSLR with the same lens and at the same subject distance, the image at the film plane is still 2.4cm long at 1:1 or Life Size. However, 2.4 cm is about full frame in size and the subject will now occupy all the frame. For a given print size the subject will appear bigger in the frame. Thus it appears magnified compared to a 35mm camera.

Monday, November 30, 2009

Counting a Dozen

My 3 year daughter was learning how to count which rendered an idea for this photo project - Counting a Dozen.
Each picture here corresponds to a number 1 - 12. Simmilar concept was compiled in DPS, one pic posted by a member every day for 12 consecutive days starting with number 1 and going all the way to number 12.
These pictures of mine are from the same collections of DPS

Blue Angels @ Houston

1 boot rising.

Blue Angels @ Houston

2 Hornets roaring.

3 Arches of Water Wall

3 Arches of waterwall inviting.

4th Traveler

4th traveller is following.

5 lil fingers

5 little fingers.

6 Colors

6 different colors (moods)

Abstract_08

7 hearts falling.

8 windows

8 windows gaping.

9 Arches

9 arched doors inviting.

10 Lanes Freeway @ Los Angeles

10 lanes are guiding.

11 Birds

11 birds resting.

Tennis Ball Cans

12 cans of balls waiting to be opened...

Monday, November 9, 2009

Abstract

Abstract_06Abstract photography is a field that leaves many puzzled as to what exactly it includes. The definition varies so much by photographer and gallery, it seems like there is no common ground whatsoever. Probably the most common reaction is, What is this supposed to mean? most abstract photographs aren't supposed to carry any particular meaning. Many intend to create a certain mood. For instance, cool colors, smooth lines and a soft focus may be intended to create a calming effect on the viewer.
Abstract photography is a process of using colours and patterns combined to create an image, with no true meaning or no clear subject involved. Abstract photography is not necessarily going to mean the same thing to everyone. and helps us concentrate on texture and colour rather than the whole subject.
Abstract_08
The most common reaction to abstract photographer is probably an incredulous, curious, What is that? Many abstract photos have no clear or discernible subject, while others try and make the subject appear like an entirely unlike object.
Abstract_09
Most abstract photographers focus on the everyday objects around them, familiar things that they show us through their third eye to be less familiar than we like to think.
Abstract_03
Special attention to color is paid by abstract photographers. The use of color filters is a very common technique.
Abstract_04
Another factor that many abstract photos have in common is close attention to texture. Repeating patterns are a favorite of many abstract photographers.
Abstract_07
Abstract photography, because of the sheer amount of imagination and creativity involved in the process, also serves as an excellent exercise for photographers of other fields to help improve their craft in general, building skills in attention to detail, color and texture, and stretch the boundaries of their own personal style with experimentation. It's a wonderful type of photography to explore—try it for yourself.
My Shadow

Mark Raymond has a great collections on Abstract Photography.
Mark Raymond Mason
Collections of Abstract photographs

Thursday, November 5, 2009

Shooting Airshow with Point and Shoot Camera


Taking interesting pictures at an airshow does not always require expensive SLRs. Last weekend I attended my first airshow ever. 25th Annual Wings Over Houston Airshow at Ellington Airport on Saturday, October 31 and Sunday, November 1 2009. I'd share with you what I learned so far.
All photos were taken with a Sony Cybershot DSC-H2, and I'm describing my experiences specific to this model.
I found these features useful:
Manual focus: Most things happen pretty far from you, so you can safely set focus to infinity and just shoot away without the delay needed by autofocus.
Custom settings memory: Some cameras will allow you to remember your favorite settings. Before the show, I programmed the camera to: zoom at maximum, manual focus set at infinity (see above), continuous drive mode and Aperture was set up to 1/1000 sec.

And thats it after this it was just click click click ...


On the picture on right I tried to get US flag to add some flavor to the pic.


Bright and clear sky added more savor but be prepared for the hot weather. Wear a hat and apply sunblocker on exposed skin. Also, be sure to drink a lot of water to prevent dehydration


I used wide angle option for the photo above; the plane wasn't important, the smoke trail and vastness of the sky were.


And the audience's reaction was as interesting as the show in the sky.


To know more about this airshow and about Blue Angels you can visit these sites

Friday, October 30, 2009

Clicking Fireworks

Clicking Fireworks 01Whether it is Deepawali (Festival of lights) or Fourth of July it means Fun, Food and Fireworks. However fireworks photography is not as hard as you have been led to believe. I usually shoot fireworks with camera on tripod because to capture this magnificent light work we need a slow enough shutter speed to capture the falling light trails. Few things which needs to be kept in mind while shooting Fireworks


  • Framing: It is hard to guess the exact location where fireworks are going to explode so it is better to take wider shot and then crop the pics.
  • Focus: Again for the same reason it is hard to focus so turn off camera's auto focus mode. Either prefocus or set to landscape mode for infinite focus. 
Clicking Fireworks 02
  • Support and Eliminating Shake: Tripods or other sturdy support are a must for fireworks photography. Even the best image stabilization technology is unlikely to be able to give you a rock solid image.
  • Zoom lens: Use a zoom lens (ideally 200mm or more) so you can get in tight and capture just fireworks themselves.
Clicking Fireworks 03


  •  Aperture and Shutter speed settings: Usually it is recommended to shoot in two settings Shutter Speed set to 4 seconds and Aperture to f/11. Fire a test shot and fine tune these two settings to get the desired pics.
Clicking Fireworks 06

  • If you want fireworks and the background (like temple in pic), then use a wider lens.
  • Blending two image: Two seperate photos one of temple (wider lens) and other of fireworks (zoom lens) and then combine them together using Photoshop.


    Clicking Fireworks 05
More about  Fireworks Photography