Friday, May 28, 2010

Smoke Art - Photography

Namaskaar
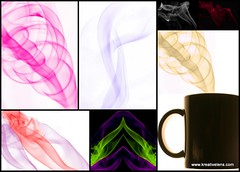
Smoke Photography can free your imagination. I was browsing Graham Jeffery’s (who has mastered the art of smoke photography) pictures and found it very impressive and fascinating. The link from his website contains his amazing work and also explains the technique to shoot smoke along with post processing tips on smoke shots. http://sensitivelight.com/smoke2/.

Here are few points which I learnt while shooting smoke
1.The cheapest way to get the “right” kind of smoke is using incense sticks.
2.Smoke is sensitive to even the tiniest of disturbances; use this to your advantage to sculpt your photo. Even smoke likes to dance on A.R. Rehman’s music.
3.Lighting plays a very important role while shooting smoke. You need a good depth of field (DOF) to capture all the details of a smoke column. To accomplish that you’ll need a well lit smoke with the most powerful source of light you can find.
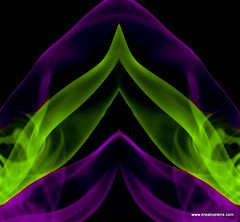
4.The smoke produced by incense sticks is a light white color, so use a darker background. In this way you’ll have great contrast between the foreground and the background to better capture the nuances in the smoke. It’s common to see white smoke on a black background, and it’s easier to take the photo that way. But what about all those images with colored smoke with white background? Those are false negatives, created in post-processing.
5.To get the smoke focused can be difficult. Use any object or your own hand and place it the same distance as the smoke and use auto focus to focus it and after the auto-focus is done with its job, it’s time to turn manual focus on and start shooting without moving the camera.
6.ISO settings should be low as smoke has dust and you don’t want to introduce additional grains due to high ISO.
7.Once you get nice picture you can use any image processing software to post process the shots. Mainly cleaning up imperfections on the background, adjust contrast, sharpening, inverting, coloring, cropping ……

Link below discuss more about smoke photography and smoke art
http://www.smashingmagazine.com/2008/10/05/celebration-of-smoke-photography-and-smoke-art/

Smoke Collage

Thursday, May 6, 2010

Photographing Special Effects - Multiple Exposure

Moon Light
While your camera is adept at recording the real world, you can also use it to create fantasy images that will baffle and delight your viewers. Among the most notable of these special effects is multiple exposure – two or more images superimposed or juxtaposed.
You might be wondering how there can be so many shots of American cities including a full moon when most buildings are too tall for a natural moonrise over the city skyline. The answer is simple: the magic of double exposure. I prefer this treatment because I can then decide exactly where I want the moon to be in my compositions.
In double and multiple exposures, one or more captures are combined to create a single well-exposed image. Thus if you want to create a double exposure, you must shoot two images, both underexposed by one stop, and combine them to get correct double exposure.
In some multiple exposures, much of the superimposed images will overlap. Try to make the images complement one another and distribute their tones to avoid too much exposure in one area and not enough in another.
Table below shows the exposure based on the number of images in montage.
Number of Images in montage
Number of f-stops to decrease exposure.
2
1
3
1 ½
4
2
5
2 ¼
6
2 ½
7
2 ¾
8
3

There is an important aspect to note about double and multiple exposures. Once an area is fully exposed to white, it cannot be exposed with any other color. This is one reason why you don’t see multiple exposures shot in snow.
Despite the need to be careful and precise, you will find that creating a double exposure is easy. You shoot the two compositions at one stop under the indicated reading.

Multiple Exposure

Multiple Exposure

Monday, February 22, 2010

Rear Sync - Flash

There's a setting on you camera that will help you get better-quality photos using flash. It's called Rear Sync, and what it basically does is change the time when the flash actually fires. Usually flash fires the moment you press the shutter button, so it does freeze any action in the scene, but it also generally makes everything solid black behind your subject (like you see in most snapshots). Changing to Rear Sync makes the flash fire at the end of the exposure (rather than the beginning), which lets the camera expose for the natural background light in the room first, and then at the very last second, it fires the flash to freeze your subject. Now your background isn't black - instead, it has color, depth, and detail, and this gives you a much more professional look all the way around. In the example below, the shot on the left is using the normal default flash setting (notice how dark the background is). For the shot on right, I switched the flash to Rear sync.


Give it a try and you'll see what I mean (just remember to keep the camera still when shooting in Rear Sync mode, because the shutter stays open longer- enough to expose for the background.)


This setting is very useful, while shooting in an aquarium where you want to capture the subject along with low light activities in background.

Monday, January 25, 2010

Depth of Field


While using point and shoot cameras never have given depth of field a second thought. Thats because the lens on a point-and-shoot, is deliberately designed to provide the maximum possible depth of field.
In fact it is one of the most important controls in photography. Depth of field can be used to disguise or soften objects within the frame, or to make a photograph look so sharp that it almost comes alive. A lens can focus precisely at only one distance at a time. To be completely sharp, the image must record points of light reflecting from the subjects as points of light on the sensor. Away from this plane of focus, points are recorded as minute circles, known as "circle of confusion". The larger these circles, the more out of focus the sot appears. For certain range of distances, the circles are small enough and to look like points, so the image appears sharp. This in focus range is known as the depth of field. For the 35mm format, the least circle of confusion is usually considered to be 0.0015in (0.036mm)

Three ways to affect depth of field.

1. Aperture - Making the aperture smaller increases the depth of field, while opening it up restricts it. The amount of available light also has some impact on depth of field. In low - light conditions only way to achieve a wide depth of field (using a small aperture of f/11) would be to have a long exposure of say, 2 sec or longer, in which case you'll certainly need a tripod. The opposite happens in very bright conditions, where the only way to achieve a very narrow depth of field (using a large aperture of f/2.8) would be to have an extremely fast shutter speed of, say, 1/4000 or even 1/8000 sec or use dark filter in front of lens.


Picture on left shot at A = f/35 , Focal length 617mm. Picture on right shot at A = f/4.5 , Focal length 617mm.

Due to larger aperture (f/4,5) out of focus subject is very very blurred.

2. Focused distance - At close distances, all lenses offer less depth of field than when they are focused farther away as seen below.


Both pictures shot at A = f/5.6 , Focal length 193 mm but focused on different object.

3. Focal Length - The amount of depth of field reduces dramatically as focal length lengthens.


Picture on left shot at A = f/5.6 , Focal length 193mm. Picture on right shot at A = f/5.6 , Focal length 64mm.


A point to be noted: Depth of field usually extends farther behind a focused subject than it does in front of it. The depth of field behind the focused point is approximately twice that in front.


Some informative links on Depth of Field.

Depth of Field Calculator
More on Depth of Field calculator